概览
对着 README 文件, 看看 QwenVL 的基本情况, 以及我们需要了解什么
代码结构
 1
 2
 3
 4
 5
 6
 7
 8
 9
10
11
12
13
|
qwenvl/
├── train/           # 训练核心模块
│   ├── trainer.py   # 自定义训练器(基于HuggingFace)
│   ├── train_qwen.py # 训练主入口
│   └── argument.py  # 参数定义类
├── data/            # 数据处理模块
│   ├── __init__.py  # 数据集配置注册
│   ├── data_qwen.py # 标准数据处理
│   ├── data_qwen_packed.py # 打包数据处理
│   └── rope2d.py    # 2D位置编码实现
└── tools/           # 辅助工具
    ├── process_bbox.ipynb # 目标检测数据转换
    └── pack_data.py # 数据打包工具
|
大概是这些, 和实际的有些出入
它给了一个 demo, 里面包含一些图片视频以及相应的 json
我准备先从 demo 入手
demo
这个文件夹里提供了图片, 视频, 以及对应的 json 文件
单图片训练数据
 1
 2
 3
 4
 5
 6
 7
 8
 9
10
11
12
13
|
{
  "image": "demo/images/10095.png",     // 图像路径(相对路径)
  "conversations": [                    // 对话数组
    {
      "from": "human",                  // 用户角色
      "value": "Is the value of Favorable 38 in 2015?\n<image>"  // 问题+图像标记
    },
    {
      "from": "gpt",                    // 模型角色
      "value": "Yes"                    // 简洁的回答
    }
  ]
}
|
- 图片路径
- 对话, 其中包含
- 用户角色, 具体问题以及图像标记
- 模型角色, 以及响应的回答
- 此外, 也支持多个图像的训练, 就像下面这样
1
2
3
4
5
6
7
8
9
|
{
	"images": ["cats/001.jpg", "cats/002.jpg"],
	"conversations": [
	{
		"from": "human",
		"value": "<image>\n<image>\nWhat are the differences between these two cats?"
},

......
|
视频训练数据
 1
 2
 3
 4
 5
 6
 7
 8
 9
10
11
12
13
|
{
    "video": "v_7bUu05RIksU.mp4",       // 视频文件名
    "conversations": [
        {
            "from": "human",
            "value": "<video>\nCan you give me an overview of the video content?"
        },
        {
            "from": "gpt",
            "value": "The video showcases a group of men washing cars..."  // 详细描述
        }
    ]
}
|
其实跟图像差不多, 就是把 image 标记换成了 video
目标检测/定位
 1
 2
 3
 4
 5
 6
 7
 8
 9
10
11
12
13
|
{
    "image": "demo/COCO_train2014_000000580957.jpg",
    "conversations": [
        {
            "from": "human",
            "value": "<image>\nLocate house in this image and output the bbox coordinates in JSON format."
        },
        {
            "from": "gpt",
            "value": "{\n"bbox_2d": [135, 114, 1016, 672]\n}"
        }
    ]
}
|
这里 demo 没有给, 但是在 readme 里写出来了
这里 value 里的值是模型输出的物体边界框坐标
scripts
这是训练的核心配置
1
2
3
4
5
6
7
|
scripts/
├── sft.sh              # 3B模型训练脚本 (入门首选)
├── sft_7b.sh           # 7B模型训练脚本
├── sft_32b.sh          # 32B模型训练脚本
├── zero2.json          # DeepSpeed ZeRO-2 配置
├── zero3.json          # DeepSpeed ZeRO-3 配置
└── zero3_offload.json  # DeepSpeed ZeRO-3 + CPU卸载配置
|
这里我准备就看 3B 的, 因为相对简单? 并且我们的模型也是用的 3B 模型
分布式训练
1
2
3
|
MASTER_ADDR=${MASTER_ADDR:-"127.0.0.1"}    # 主节点地址
MASTER_PORT=${MASTER_PORT:-$(shuf -i 20001-29999 -n 1)}  # 随机端口
NNODES=${WORLD_SIZE:-1}                     # 节点数量
|
- MASTER_ADDR: 主节点地址,默认本地训练
- MASTER_PORT: 通信端口,随机选择 20001-29999 范围内的端口
- NNODES: 节点数量,默认单机训练
DeepSeed 配置
1
|
deepspeed=./scripts/zero3.json
|
使用 ZeRO Stage 3 优化策略,可以显著减少显存占用,支持更大模型训练
(不了解, 回头需要看一下)
模型配置
1
|
llm=Qwen/Qwen2.5-VL-3B-Instruct
|
使用 HuggingFace 上的 Qwen2.5-VL-3B-Instruct 预训练模型
超参数
1
2
3
|
lr=2e-7          # 学习率:非常小的学习率,适合微调
batch_size=4     # 批次大小
grad_accum_steps=4  # 梯度累积步数,有效批次大小 = 4×4 = 16
|
训练入口
1
|
entry_file=qwenvl/train/train_qwen.py
|
这是训练脚本的主入口文件,包含:
- 模型加载逻辑:加载 Qwen2.5-VL 预训练模型
- 数据预处理:处理图像和文本的输入格式
- 训练循环:前向传播、反向传播、参数更新
- DeepSpeed 集成:分布式训练和显存优化
- 检查点保存:模型权重和训练状态的保存
数据集配置
1
|
datasets=public_dataset1,public_dataset2
|
当前状态:这是占位符,需要替换为实际数据集
数据集要求:
- 图像-文本对话格式
- JSON 或类似结构化格式
- 支持指令跟随的对话数据
核心训练参数
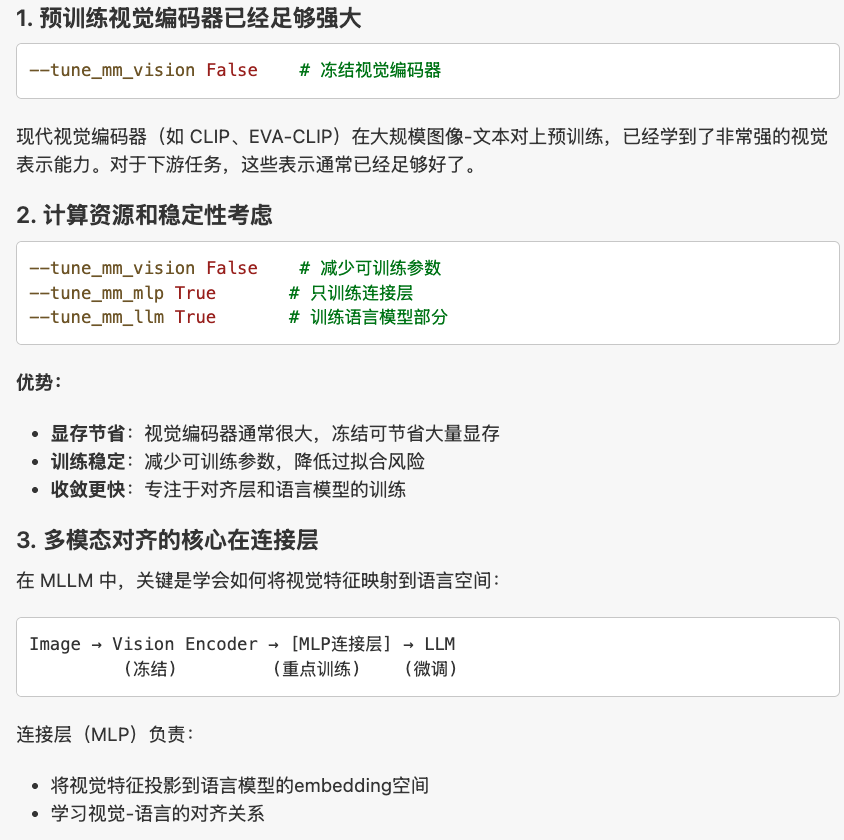
模型组件微调配置
1
2
3
|
--tune_mm_vision False    # 不微调视觉编码器
--tune_mm_mlp True       # 微调多模态连接层
--tune_mm_llm True       # 微调语言模型部分
|
我的疑问: 为什么不微调视觉编码器?
是因为即使微调了, 相比于大厂的 pre-train 的效果也微乎其微?
还是说这是 mllm 的一些微调要求?
数据处理参数
1
2
3
|
--max_pixels 50176       # 最大像素数(约224×224)
--min_pixels 784         # 最小像素数(约28×28)
--model_max_length 8192  # 最大序列长度
|
这里的序列是指模型输入的总token数量限制, 包括文本 token 和图像 token
[系统prompt tokens] + [图像tokens] + [用户文本tokens] + [助手回复tokens] = 总长度 ≤ 8192
优化器配置
1
2
3
4
|
--learning_rate ${lr}
--weight_decay 0         # 不使用权重衰减
--warmup_ratio 0.03      # 3% 步数用于学习率预热
--lr_scheduler_type "cosine"  # 余弦学习率调度
|
保存和日志
1
2
3
4
|
--save_strategy "steps"
--save_steps 1000        # 每1000步保存一次
--save_total_limit 1     # 最多保存1个检查点
--report_to wandb        # 使用 Weights & Biases 记录训练过程
|
启动命令
1
2
3
4
|
torchrun --nproc_per_node=${NPROC_PER_NODE} \
         --master_addr=${MASTER_ADDR} \
         --master_port=${MASTER_PORT} \
         ${entry_file} ${args}
|
使用 PyTorch 分布式启动器运行训练脚本
看不懂
qwenvl
1
2
3
|
qwenvl/
├── data/          # 数据处理模块
├── train/         # 训练相关模块
|
train
1
2
3
4
|
train/
├── argument.py      # 1️⃣ 训练参数定义
├── trainer.py       # 2️⃣ 自定义训练器
└── train_qwen.py    # 3️⃣ 主训练脚本
|
argument.py:了解所有可配置的训练参数trainer.py:理解训练流程和损失计算train_qwen.py:主入口,整合所有组件
argument.py
这个文件定义了训练 Qwen2.5-VL 模型的三类参数配置
这里对于三种参数类, 都使用了dataclass装饰器, 代码变得简洁许多
train_qwen.py
这是主训练脚本
导入和路径
1
2
3
4
5
|
import sys
from pathlib import Path

project_root = Path(__file__).parent.parent.parent
sys.path.append(str(project_root))
|
获取项目根目录, 添加到 python 的路径中, 确保模块正确导入
导入模块
1
2
3
4
5
6
7
|
import qwenvl.train.trainer  # 自定义训练器增强
from trainer import replace_qwen2_vl_attention_class  # 注意力机制优化

from transformers import (
    Qwen2VLForConditionalGeneration,      # Qwen2-VL 模型
    Qwen2_5_VLForConditionalGeneration,   # Qwen2.5-VL 模型
)
|
这里的 trainer 是 train 文件夹中的另一个文件, 待会看一下
工具函数
打印控制
1
2
3
|
def rank0_print(*args):
    if local_rank == 0:
        print(*args)
|
作用:在多GPU训练时,只有主进程(rank 0)打印信息,避免重复输出
模型安全保存
 1
 2
 3
 4
 5
 6
 7
 8
 9
10
11
|
def safe_save_model_for_hf_trainer(trainer: transformers.Trainer, output_dir: str):
    if trainer.deepspeed:
        torch.cuda.synchronize()    # 同步所有CUDA操作
        trainer.save_model(output_dir)  # DeepSpeed专用保存
        return

    state_dict = trainer.model.state_dict()
    if trainer.args.should_save:
        cpu_state_dict = {key: value.cpu() for key, value in state_dict.items()}
        del state_dict  # 释放GPU内存
        trainer._save(output_dir, state_dict=cpu_state_dict)
|
模型微调
 1
 2
 3
 4
 5
 6
 7
 8
 9
10
11
12
13
14
15
16
17
18
19
20
21
22
23
24
25
26
|
def set_model(model_args, model):
    # 1. 视觉编码器控制
    if model_args.tune_mm_vision:
        for n, p in model.visual.named_parameters():
            p.requires_grad = True    # 开启梯度计算
    else:
        for n, p in model.visual.named_parameters():
            p.requires_grad = False   # 冻结参数

    # 2. 多模态连接层控制
    if model_args.tune_mm_mlp:
        for n, p in model.visual.merger.named_parameters():
            p.requires_grad = True
    else:
        for n, p in model.visual.merger.named_parameters():
            p.requires_grad = False

    # 3. 语言模型控制
    if model_args.tune_mm_llm:
        for n, p in model.model.named_parameters():
            p.requires_grad = True
        model.lm_head.requires_grad = True
    else:
        for n, p in model.model.named_parameters():
            p.requires_grad = False
        model.lm_head.requires_grad = False
|
这里根据传入参数的情况, 控制哪些模块需要冻结, 哪些可以微调, 然后相应的调整梯度的设置
主训练函数
参数解析与环境设置
 1
 2
 3
 4
 5
 6
 7
 8
 9
10
|
def train(attn_implementation="flash_attention_2"):
    global local_rank

    parser = transformers.HfArgumentParser(
        (ModelArguments, DataArguments, TrainingArguments)
    )
    model_args, data_args, training_args = parser.parse_args_into_dataclasses()

    local_rank = training_args.local_rank
    os.makedirs(training_args.output_dir, exist_ok=True)
|
命令行参数 → 三个dataclass对象 → 全局变量设置
模型版本自动检测与加载
 1
 2
 3
 4
 5
 6
 7
 8
 9
10
11
12
13
14
15
16
17
|
if "qwen2.5" in model_args.model_name_or_path.lower():
    # Qwen2.5-VL 分支
    model = Qwen2_5_VLForConditionalGeneration.from_pretrained(
        model_args.model_name_or_path,
        cache_dir=training_args.cache_dir,
        attn_implementation=attn_implementation,  # 使用Flash Attention 2
        torch_dtype=(torch.bfloat16 if training_args.bf16 else None),
    )
    data_args.image_processor = AutoProcessor.from_pretrained(
        model_args.model_name_or_path,
    ).image_processor
    data_args.model_type = "qwen2.5vl"
else:
    # Qwen2-VL 分支(向后兼容)
    model = Qwen2VLForConditionalGeneration.from_pretrained(...)
    data_args.image_processor = Qwen2VLImageProcessor.from_pretrained(...)
    data_args.model_type = "qwen2vl"
|
根据模型路径名称自动选择正确的模型类和处理器
性能优化
这里不懂
分析器设置
1
2
3
4
5
6
7
|
tokenizer = transformers.AutoTokenizer.from_pretrained(
    model_args.model_name_or_path,
    cache_dir=training_args.cache_dir,
    model_max_length=training_args.model_max_length,  # 8192
    padding_side="right",  # 右侧填充
    use_fast=False,       # 使用Python版本(更稳定)
)
|
模型参数设置与监控
1
2
3
4
5
|
set_model(model_args, model)  # 设置可训练参数

if torch.distributed.get_rank() == 0:
    model.visual.print_trainable_parameters()    # 打印视觉模块训练状态
    model.model.print_trainable_parameters()     # 打印语言模块训练状态
|
训练器初始化
 1
 2
 3
 4
 5
 6
 7
 8
 9
10
11
12
13
|
trainer = Trainer(
    model=model,
    processing_class=tokenizer,  # HF新API
    args=training_args,
    **data_module
)

# 断点恢复检测
if list(pathlib.Path(training_args.output_dir).glob("checkpoint-*")):
    logging.info("checkpoint found, resume training")
    trainer.train(resume_from_checkpoint=True)
else:
    trainer.train()
|
训练完成后的处理
1
2
3
4
5
6
|
trainer.save_state()  # 保存训练状态
data_args.image_processor.save_pretrained(training_args.output_dir)  # 保存图像处理器

model.config.use_cache = True  # 推理时启用缓存

safe_save_model_for_hf_trainer(trainer=trainer, output_dir=training_args.output_dir)
|
data
1
2
3
4
5
6
|
data/
├── __init__.py
├── data_qwen.py         # 4️⃣ 基础数据处理
├── data_qwen_packed.py  # 5️⃣ 优化的数据处理(重点)
├── rope2d.py           # 6️⃣ 2D位置编码
└── data_list.py        # 7️⃣ 数据集列表配置
|